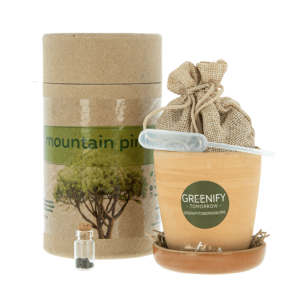
Dwarf Mountain Pine
You can start planting now with
our six types of varieties
Things to know about this Dwarf mountain pine kit
PINUS MUGO, known as dwarf mountain pine, bog pine, creeping pine, mugo
pine, mountain pine, scrub mountain pine, or Swiss mountain pine.
It is a coniferous specie, which can reach a height of 1.5-4 m. It is a shrub species, that make up compact bushes, hard to get through. In alpine areas the plant adapts to strong winds and to thick layers of snow. It reaches maturity very quickly. From 6-10 years it can produce cones. They are small, ovoid-globular. The scales of the cones shelter winged seeds. At maturity, very late autumn or winter, the cone scales unfold, facilitating the flight of seeds carried by the wind. About 100,000 peeled seeds equal 1 kg. Growth is very slow, it is a very dense wood, which due to its small size, can only be used for fire. High quality turpentine can be extracted from its resin.
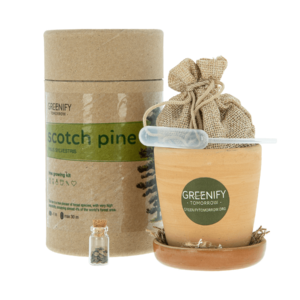
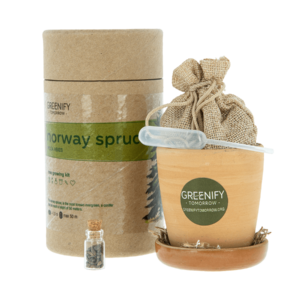
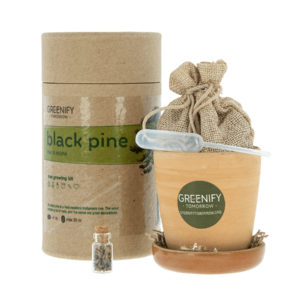
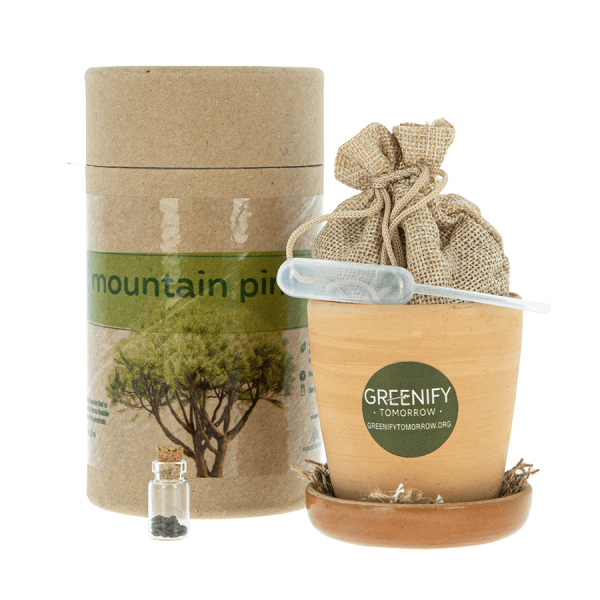
Cylindrical cardboard packaging, reusable in the household as a container for various objects, as a “piggy bank”, or as a support for writing instruments on the desk. Being made of cardboard, it is not resistant to moisture and can swell, therefore it can be damaged. The cylinder is recyclable, and by reuse you protect NATURE.
Clay pot. Burnt clay is a brittle material. Be careful not to drop it, as it can break very easily. Although the kit encourages you to work with children, please be careful so they do no not get harmed with any shards resulting in the unfortunate event that the pot breaks. Don’t worry, if the pot is broken, you can continue the project with any other container, provided it is about the same size and has a small excess drain hole at the base.
Sack with soil. The soil is a mixture of peat and compost. Both components are vegetal in nature. It does not contain additives or synthetic chemicals. It is not edible. The sack is reusable after a previous wash.
Pipette. We considered it necessary for a controlled dosage of the amount of water. It is the only plastic object. Please reuse it after completing this project for other purposes. If you still decide to throw it away, please do it selectively, with plastic waste, to be recycled.
Seed bottle. We chose to use the bottle as a container for the seeds because they are perishable. Like the clay pot, the bottle is brittle. It can break, and shards can cause cut wounds. You can reuse it or throw it away selectively.
- Mugo pine seeds (Pinus mugo). The seeds are from cones collected from the Curvature Carpathians – Brașov Depression (Piatra Mare Massif) – in 2021, from the altitude of 1700 m. The germination percentage of the seed lot is 75%, which means that statistically, three out of four seeds have a probability to sprout and give life to a tree. The seeds of this species are not edible, but their ingestion will not require any medical intervention. They are not treated with chemicals, touching them with your hand does not cause allergies. If they are not used immediately upon purchase, store the seeds in the refrigerator between 3-10 C. Thus, it retains its germination power for 1-2 years.
1. What happens if the seeds reach too deep into the soil?
If the seeds reach too deep, they risk not being able to penetrate the soil layer and will perish before sprouting.
2. What happens if the seeds become too shallow?
If the seeds become too shallow, they will germinate very quickly, the plant not having enough time to form a suitable root, so the seedlings will overturn.
3. Too little water?
If it receives too little water, it will wither. At this early age, a wilted plant can rarely be restored to its original state.
If it is considered that the water added according to the guide is too little, it is up to you to adjust the quantity. In these growth stages, the plants are very sensitive to deficit of water.
4. Too much water?
If it has too much water, it risks rotting.
If it is considered that the water added according to the guide is too little, it is up to you to adjust the quantity. In these growth stages, the plants are extremely sensitive to excess water.
5. What to do with the refrigerated seeds?
You can use any other container and flower soil to grow a new generation of seedlings. They will usually sprout more seeds, which will later become seedlings. It is not desirable to separate them at this early age. They will be able to separate at transplanting, but carefully, without shaking too much soil.
6. Should I use fertiliser?
You should not use fertiliser, artificial or natural fertilizers for as long as the seedlings are in the pot and in the soil in the kit.
What will you find in the Dwarf mountain pine Kit
![dwarf mountain pine [transparent]](https://greenifytomorrow.org/wp-content/uploads/elementor/thumbs/dwarf-mountain-pine-transparent-q8x9bphuewgnywkmvlh22wtlhrfks6m42buggmulbk.png)
Plant your tree today
You and your tree, a legacy for your upline.